Showing posts with label Norfolk. Show all posts

Saturday, October 27, 2012

Perfectly Imperfect: An Interview by and of the Designer Behind Impressed Crafts


How did I get into stamping?
After graduating from college is when I seriously started stamping. In school I knew I wanted to be a studio art major, but I was frustrated by figuring out what I wanted to do after school. I gave up art for some time and I focused my energy on someone else’s project. One day I went to a bookstore by myself and browsed the craft section. A very beautiful book on handmade prints caught my attention. I bought it, devoured it, and didn’t put it away for many days after. I soaked in the images, instructions, and aesthetic. (I might or might not have gotten teary eyed.) Most importantly, the book reinvigorated my long standing passion for making things. Since I was a young child I always enjoyed using my hands to create, and in the end I may never be a prolific, profound, Avant-garde artist, but I will always be a hand crafter.

 Where does my inspiration for new stamps come from?
One very important skill I worked hard on while being a studio artist is how to focus inspiration. That doesn’t mean I always have ideas flowing out of me. I learned that it is important to be patient during the times when it seems like inspiration, my muse, is nowhere to be found. In contrast, I have come up with ways to extract inspiration from many sources. For me, inspiration comes from people I know, music, catalogues and magazines, other bloggers, being in nature, and my dreams. For the most part, finding what inspires you can be easy. Transforming those ideas into tangible works is where the true labor comes into play. 

What is the appeal of stamps?
Imperfection! Stamping is one craft that embraces fades and broken edges. There is a natural look that hand stamping can evoke. The artist’s hand is evident as opposed to the look of industrial prints. What also attracted me to stamps is how quickly I can take an idea out of my mind or sketch book and translate it to tangible objects. I feel like I have only scraped the surface of what can be done using inks and stamps.  

Best advice for dealing with imperfection?
When I am in my studio I sincerely try not to get hung up on trying to create something that is perfect. I embrace the tiny specks of ink that sometimes show up on a printed surface. It may be that I missed fully cleaning a corner on a stamp before it is pressed, or I may not have applied even amounts of pressure to a stamp and part of the design is more faded than the rest. But sometimes that is exactly the look I am going for. It is the same kind of beauty I see in a distressed coffee table, a vintage leather bag, or the surface of pine tree bark.

 In many ways I relate personally to the stamp process. I am learning every day to embrace my imperfections. I have the daily decision to be caught up on what makes me imperfect, or I can enjoy the uniqueness that comes along with being an imperfect human. My challenge to you is to embrace your imperfections too.
-Angel Graves

Wednesday, August 1, 2012

Jar Chic


 For the past few days, I started reorganizing my home studio. Instead of mundanely cleaning up the joint, I took the time to be creative with my storage options. Recycling jars to be used as containers for tiny objects is not new to my organizational methods. To put a new twist on jar storage, I decided to create hand stamped paper wraps.  

                                                               ********************


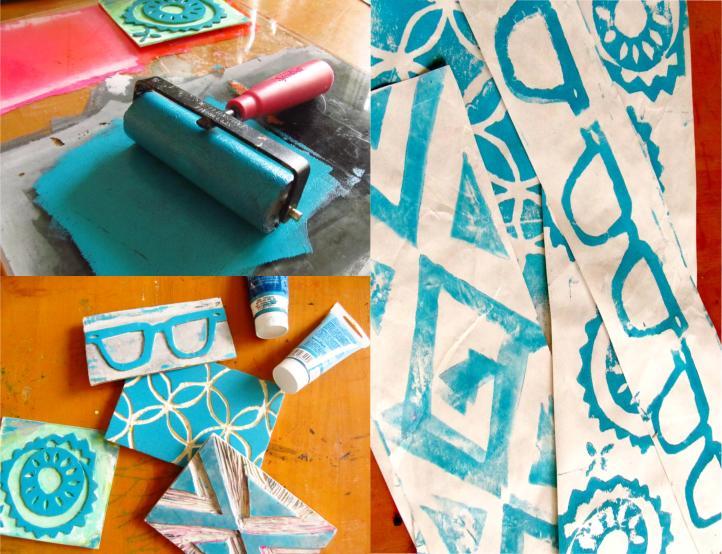
 Lucky for me, I have access to an array of stamps and inks. At a moment's notice I can roll up my brayer with turquoise ink, cover the surface of several stamps, and print out a couple strips of soon-to-be wraps.  Even if you do not already have a collection of stamps and ink, the supplies are not expensive. You could make your own stamps or use store bought ones that match your surroundings. 


Pictured above are the jars au naturel.


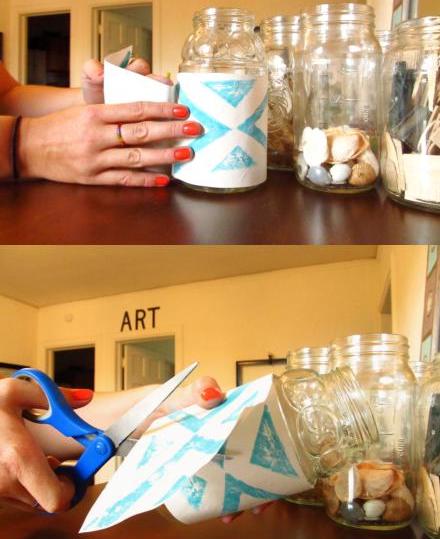
            For the best result, I first wrapped the stamped paper around the jars to measure how much was needed to cover it. I left about a half inch overlap. 


The next steps are easy enough and I am sure pictures help. Create four tape rolls and then place them in the four corners of the paper strip on the reverse side. Then simply place the strip centered on the jar and roll the jar over until you reach the end. At the end of the strip, smooth the paper with your hand to make sure the tape will keep the paper in place. 


Now that the jars are finished, they add a custom and colorful touch to my studio. One of the best things about this project is how easily you can change the colors and styles of these jar wraps. I hope these little beauties inspire the use of recycled jars in new ways.

Saturday, July 21, 2012

Reflection Redux


       Change is as natural as air, and very much just as necessary. If asked, anybody who has ever lived with me can tell you that any space I consider home is readily changing. Furniture gets rearranged on a whim, surfaces get a fresh coat of paint, fabrics get covered and recovered, and new things appear on the walls with regularity. In a way, rearranging is how I keep inspiration flowing.
                                              ********************************

         In the picture below is a large mirror that I found during one of many "thrifting adventures" {as I like to call them}. I saw it and had to have it. When I got it into my apartment, I had no idea what to do with it. It was large, heavy and not exactly the right colors. Instead of getting rid of it, I kept it and shuffled it around the living room along with all the other furnishings. After some time it found a good home on the dining table.


    Being the artist that I am, I could not keep paint away from the mirror. Instead of the bright reds, and oranges, and dark blues, I decided to go with a more soothing analogous color scheme.
         After several coats of paint, and many brush cleanses later, the mirror changed into a piece that vibes better with the rest of the living room. That is not to say that I wont ever change it again ;-)

Thursday, June 14, 2012

Keep it Clean

        Cotton kitchen towels make for amazing blank canvasses for stamps. The towels perfectly soak up dye colors to create vibrant saturation. After I hand dye or tie dye the towels, I use a fabric friendly ink to stamp them. It is fun to create sets of two towels and make each set have a common theme. Recent inspirations for my themed towels are song writing I have been doing, and the exciting OpSail exhibition that happened last week here in Norfolk. Many more themes and colors to come. I would love to know what themes everyone has in their kitchens. That way, I could create special sets for everyone.    


Wednesday, May 9, 2012

Infinity Scarves

       Thinking back to childhood, I remember tons of school programs highlighting the importance of recycling. Maybe it is this background on the matter that has lead me to be fascinated with the "Three R's" described in a school house rock melody. Reduce, Reuse, Recycle. This song brilliantly prioritizes important concepts that really could help the environment. Because of my attraction to the triple Rs, I am very interested in eco-chic crafting. One of my current objects of re-transformation is the cotton T. There are SO MANY in existence! 
        So far, I have come up with  creating these infinity scarves out of previously loved t-shirts. (What a great way to combine up-cycling and stamping if I say so myself.) 

 Another cool thing about these scarves is how versatile they can be. When pulled around the shoulders, they can be used as a shawl, or they can be wrapped around twice to be a cute unique collar.


*****I would love other styling suggestions, just let me know! If you are really digging these, they will be in my Etsy shop. :-)

Tuesday, May 1, 2012

Post Test Tie Dye Day

    Here are some results from my tie dye test day. I am very pleased with the results, apart from the mess in my studio. These brilliant colors were well worth the wait. Avocado, Aqua Marine, Raspberry, and Golden Yellow mix and meld together to create joyful kaleidoscope.    
Above is an example from the Spiral technique.  
This Avocado and Aqua Marine beauty was created from the Fan Fold technique. 

  
Remember the "Carrot"? Pictured above is the carrot unraveled. 
 *************
The rest of these pretty things were free styles. What do you think?

After these successes I am super excited for Saturday and to share these techniques!

Monday, April 30, 2012

Tie Dye Test Day


     Today I decided to play with more old and new tie dye techniques. I will be teaching a class this Saturday at a really awesome shop in Norfolk called Kitsch. Handmade in Virginia products from soaps to pillows is what they sell. Along with goods to buy, they offer crafting classes. I am excited to teach in general and I hope this goes well. In prep for Saturday I did this dye session and I took pictures to share on the blog.  
    This first series of photos are a sample of some "tied" shirts.
Spiral
Fan Fold
I'm calling it the "Carrot"
   These next photos are of dye application. Seriously my favorite part and the most fun. 

Next post I will show case the results of today's work. To set the dye properly, a full 24 hours should be waited to undo the rubber bands. Being a results oriented crafter this is the hardest part. WAITING! God forbid I practice a little patients :-)
****Maybe next time I will wear gloves