
Tuesday, November 27, 2012
Tuesday, November 13, 2012
Fall Catalogue

For about two months I secretly worked on a new clothing line. What this line consists of is UP-cycled, carefully selected, quality vests, dresses, blouses, and jackets. After selection, each piece was hand dyed, hand stamped, or both in my home studio. This fall style is very much inspired by bohemian beauties, global patterns, and of course Norfolk, Va. I had the fortunate experience of debuting Impressed Apparel at the wonderful new With Lavender and Lace boutique. The owner, and my amazing friend, Kelsie McNair graciously let me borrow some of her vintage pieces to mix with the collection for this photo shoot.
For this post I had the pleasure of shooting a lovely friend of mine Elisa Nyassom. (She is a photographer, check out her stuff.) Also, super cute Shannon McMillen joined the shoot! Thank you very much girls! <3


Monday, November 12, 2012
Just a Quick Update
I did it! I moved into the apparel territory. Now I am stamping and dyeing clothes!
**********

Saturday, October 27, 2012
Perfectly Imperfect: An Interview by and of the Designer Behind Impressed Crafts

How did I get into stamping?
After graduating from
college is when I seriously started stamping. In school I knew I wanted to be a
studio art major, but I was frustrated by figuring out what I wanted to do
after school. I gave up art for some time and I focused my energy on someone
else’s project. One day I went to a bookstore by myself and browsed the craft
section. A very beautiful book on handmade prints caught my attention. I bought
it, devoured it, and didn’t put it away for many days after. I soaked in the
images, instructions, and aesthetic. (I might or might not have gotten teary
eyed.) Most importantly, the book reinvigorated my long standing passion for
making things. Since I was a young child I always enjoyed using my hands to
create, and in the end I may never be a prolific, profound, Avant-garde artist,
but I will always be a hand crafter.
Where does my inspiration for new stamps come
from?
One very important
skill I worked hard on while being a studio artist is how to focus inspiration.
That doesn’t mean I always have ideas flowing out of me. I learned that it is
important to be patient during the times when it seems like inspiration, my
muse, is nowhere to be found. In contrast, I have come up with ways to extract
inspiration from many sources. For me, inspiration comes from people I know,
music, catalogues and magazines, other bloggers, being in nature, and my
dreams. For the most part, finding what inspires you can be easy. Transforming
those ideas into tangible works is where the true labor comes into play.
What is the appeal of
stamps?
Imperfection! Stamping
is one craft that embraces fades and broken edges. There is a natural look that
hand stamping can evoke. The artist’s hand is evident as opposed to the look of
industrial prints. What also attracted me to stamps is how quickly I can take
an idea out of my mind or sketch book and translate it to tangible objects. I
feel like I have only scraped the surface of what can be done using inks and
stamps.
Best advice for
dealing with imperfection?
When I am in my studio
I sincerely try not to get hung up on trying to create something that is
perfect. I embrace the tiny specks of ink that sometimes show up on a printed surface.
It may be that I missed fully cleaning a corner on a stamp before it is
pressed, or I may not have applied even amounts of pressure to a stamp and part
of the design is more faded than the rest. But sometimes that is exactly the
look I am going for. It is the same kind of beauty I see in a distressed coffee
table, a vintage leather bag, or the surface of pine tree bark.
In many ways I relate personally to the stamp
process. I am learning every day to embrace my imperfections. I have the daily decision
to be caught up on what makes me imperfect, or I can enjoy the uniqueness that comes
along with being an imperfect human. My challenge to you is to embrace your
imperfections too.
-Angel Graves

Tuesday, August 28, 2012
Why Vintage?

My latest musings and thoughts have been set towards vintage clothing. Why do I dress the way that I do? What is the true appeal of vintage and pre-owned goodies? After asking myself these questions, I came up with a few illustrated answers I think are worth sharing.
*************************


{This top was a thrift store find. It is a smooth silk and judging by the construction it was hand made. A huge bonus to it's handmade quality, it fits like it was made for my body measurements!}
Vintage styling can be an expression that says "Hey! I'm not so down with main stream culture!" In a way it is a rebellion against status quo. I am not completely dissing contemporary fashion and style, I am merely expressing my freedom of choice. Mixing vintage with modern is a great way to have a very full and rich wardrobe.


{This dreamy mint colored sun dress is another thrift store find. My heart jumped a little when I saw it. I also squealed with joy when it fit perfectly.}
By wearing vintage I am paying tribute to women I look up to. Women such as my grandmothers, mother, and aunts. These are people who worked hard and looked great doing it! I was raised by my mother to take pride in how I dressed. A person's impression of another is strongly based on looks. Why not put your best foot forward? There is a certain great feeling that comes with dressing well.


{This funky beauty was a generous gift from Kelsie McNair, owner of the vintage boutique With Lavender and Lace in Norfolk, VA. Check out the facebook and give it some likes :-) Thanx Babe!}
On a more material level, I feel like I am rescuing and reusing something that is a quality made item. If it can last as long as it has, it was made right the first time. Some people may have qualms with used clothing but once laundered or tailored most clothes can be good as new.

{I scored these lovely shoes at an antique store in Richmond. Having a size 9 & 1/2 can prove to be a challenge in the shoe world. When I do find great shoes in my size I almost always buy them.}
It is all in the details. Small cut out shapes, intricate laces, screen printed patterns, etc. Vintage clothing tend to have amazing and quirky details. It is this attention to detail that makes a piece of clothing unique.
**********************
What vintage or reused beauties get you excited about dressin up?
Monday, August 13, 2012
Girl's Gotta Eat

Monday of last week, Robbie got his wisdom teeth pulled out. {OUCH!}
Trying to live up to the saintly nature of my namesake, I decided to create this wellness soup for my dearest. Fortunately, this soup is not only healthy, but it is tasty!
***************
To make this gloriously green soup, you only need a few ingredients that you may already have in your fridge and pantry.
3-4 handfuls of dark leafy greens {baby spinach, baby chard, & baby kale}
1/2 cup chopped onions
2-3 large garlic cloves {peel & chop}
1 teaspoon salt
4-5 grinds of fresh black pepper
2 cups veggie or chicken stock
1 tablespoon butter or earth balance
***************
Directions:

***************
When I tasted this soup I fell in green leafy love. To make it into a meal, I put together a few simple snacks. Frozen grapes are super simple but a snappy cool treat in the summer. Avocado wedges on top of goat cheese cream cheese is a delicious topper for my favorite water crackers.

Hope you all try this delicious soup and add some veggies into your daily meal routine. It would be an easy recipe to alter to your taste. You could easily change it up by using different veggies or by simply adding a hard cheese such a parmesan cheese.

Wednesday, August 1, 2012
Jar Chic

For the past few days, I started reorganizing my home studio. Instead of mundanely cleaning up the joint, I took the time to be creative with my storage options. Recycling jars to be used as containers for tiny objects is not new to my organizational methods. To put a new twist on jar storage, I decided to create hand stamped paper wraps.
********************
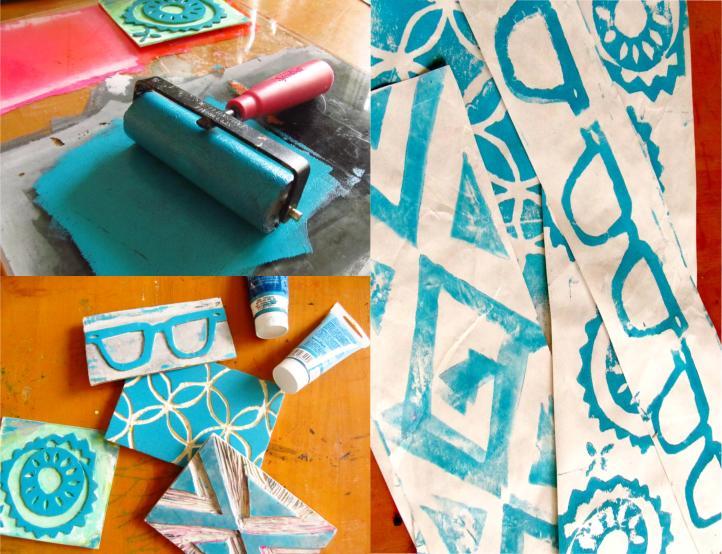
Lucky for me, I have access to an array of stamps and inks. At a moment's notice I can roll up my brayer with turquoise ink, cover the surface of several stamps, and print out a couple strips of soon-to-be wraps. Even if you do not already have a collection of stamps and ink, the supplies are not expensive. You could make your own stamps or use store bought ones that match your surroundings.

Pictured above are the jars au naturel.
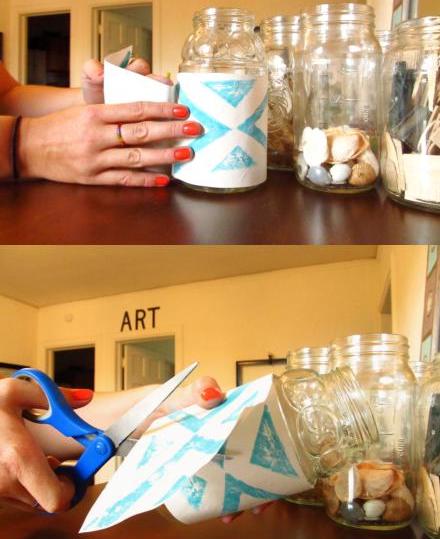
For the best result, I first wrapped the stamped paper around the jars to measure how much was needed to cover it. I left about a half inch overlap.

The next steps are easy enough and I am sure pictures help. Create four tape rolls and then place them in the four corners of the paper strip on the reverse side. Then simply place the strip centered on the jar and roll the jar over until you reach the end. At the end of the strip, smooth the paper with your hand to make sure the tape will keep the paper in place.

Now that the jars are finished, they add a custom and colorful touch to my studio. One of the best things about this project is how easily you can change the colors and styles of these jar wraps. I hope these little beauties inspire the use of recycled jars in new ways.
Saturday, July 21, 2012
Reflection Redux

Change is as natural as air, and very much just as necessary. If asked, anybody who has ever lived with me can tell you that any space I consider home is readily changing. Furniture gets rearranged on a whim, surfaces get a fresh coat of paint, fabrics get covered and recovered, and new things appear on the walls with regularity. In a way, rearranging is how I keep inspiration flowing.
********************************
In the picture below is a large mirror that I found during one of many "thrifting adventures" {as I like to call them}. I saw it and had to have it. When I got it into my apartment, I had no idea what to do with it. It was large, heavy and not exactly the right colors. Instead of getting rid of it, I kept it and shuffled it around the living room along with all the other furnishings. After some time it found a good home on the dining table.

Being the artist that I am, I could not keep paint away from the mirror. Instead of the bright reds, and oranges, and dark blues, I decided to go with a more soothing analogous color scheme.


Thursday, July 12, 2012
Flame Stitch Chair Makeover

One of my many hobbies besides stamping is revamping vintage furniture. I am very certain that it runs in the family. When you have to be thrifty and you are creative, wonderful things can happen. It is possible to have the living space you desire if you are willing to look at your personal space as a problem to SOLVE instead of just a problem.

Turning a vintage chair modern can be a seriously rewarding and easy project. Above are a few of the supplies you need to get started.
1. My personal favorite tool: a staple gun and staples
2. Screwdriver to remove the screws that secure cushions to chair
3. Scissors for cutting your choice of fabric{*if you are into this blog you def. already have these}
4. Fabric {you wont need too much depending on the project you take on, I used about one and a half yards with still some to spare}

This chair is a piece that I purchased a couple years ago for about $5.00 and it survived many college dwellings, parties, and cats. What I really love about this chair is how easy the cushions can be removed. When you are looking for your own project, keep that in mind. Fabric and padding are easy fixes as long as the structure of your chair is sound to begin with.
******************************

Step 1: Use your screw driver to remove chair cushions. {keep screws in an easy to find spot. It would be a bummer to loose them!}

Step 2: Remove the old staples that are holding the existing fabric to the cushions. Sometimes you can achieve this by simply pulling at the fabric but if you need added leverage, I recommend using needle nose pliers.

Step 3: Use old fabric as your template for cutting new fabric. This is the easiest way to accurately measure your new fabric.

Step 4: Lay the cushions on top of the new fabric and make sure the fabric is centered. Begin to staple new fabric to the backs of your seat cushion(s), working along one side at a time.

Step 5: Remember to keep the edges of your fabric folded over once so that you do not have leftover hang underneath of your seat. When you have finished stapling, replace your cushion(s) onto the chair frame.
***************************

After a little elbow grease, this chair has a fresh new look that is simply elegant and reminiscent of Eames designed furniture. I hope this post will inspire some serious chair UP-CYCLING makeovers.
Saturday, June 30, 2012
Heat Wave

Summer weather has officially arrived in Ghent. Everyone I know is taking shelter at a cafe, local shops, or any place with air conditioning.The Impressed studio has yet to receive this modern gift of A.C. What this weather has brought us is extra quick, extra strong drying power for the kitchen towels I dyed this week. It is fun to pretend that the apartment is actually in some tropical Caribbean city. The bright citrus colors of the towels hanging from the fire escape railings truly add a Carnival kind of feel to the place. Thank you to summer for such lovely musings and free and natural drying methods.


Thursday, June 14, 2012
Keep it Clean
Cotton kitchen towels make for amazing blank canvasses for stamps. The towels perfectly soak up dye colors to create vibrant saturation. After I hand dye or tie dye the towels, I use a fabric friendly ink to stamp them. It is fun to create sets of two towels and make each set have a common theme. Recent inspirations for my themed towels are song writing I have been doing, and the exciting OpSail exhibition that happened last week here in Norfolk. Many more themes and colors to come. I would love to know what themes everyone has in their kitchens. That way, I could create special sets for everyone.


Subscribe to:
Posts (Atom)